 This tutorial by Tierney Steelberg, Digital Liberal Arts Specialist at Grinnell College’s DLAC, is licensed under a Creative Commons Attribution-NonCommercial-ShareAlike 4.0 International License.
Table of Contents
What Is Sites @ Grinnell?
Grinnell College provides students, faculty and staff members with domains of their very own, by request, through Sites @ Grinnell, in a web hosting partnership with Reclaim Hosting. A domain is basically a location on the web showcasing content and applications of the owner’s choosing, hosted on a web server, with a domain name that allows others to visit this location.
Logging In
You can log in WordPress website by navigating to the URL emailed to you when your website account was created. You can refer to information on the main website for the course.
Sites @ Grinnell keep regular back-ups (usually on a daily basis) for 30 days, so have no fear in case of any glitches or issues! We will be able to restore your content using the latest backup.
For this project, you will log in at the site level, but please know that it is possible for you to request and build out additional websites in a domain of your own through Sites @ Grinnell. Simply navigate to the Sites @ Grinnell homepage and fill out the “Request a Domain” form.
WordPress Websites
WordPress is a powerful, open-source content management system for building websites.
What makes a “good” website?
Let’s discuss!
- Accessibility: making sure navigating the site is easy, that menus are easy to understand, that text and background color have legible contrast
- Engaging formatting: no walls of text or images without detail – a good balance of both
- Interactive elements – how will the viewer be interacting with the site?
- Contrast in design, easily navigable elements
- An interesting header / top toolbar: add touches that give the site personality
- Accessible captions and alt text for images
Site Dashboard
From the back-end site dashboard of your WordPress site, you can manage the entirety of your site: create site content, customize and style your site, organize its contents. The WordPress default install is intended you help you get started, but this site is yours and you are free to customize it to your heart’s content!

On the left-hand side of your dashboard, you will see a variety of site options. This walkthrough you will teach you how to use some of the most important ones for getting your site up and running.
FYI: Pages vs. Posts
WordPress allows you to create both webapges (Pages) and blog posts (Posts).
From WordPress:
In WordPress, you can put content on your site as either a “post” or a “page”. When you’re writing a regular blog entry, you write a post. Posts, in a default setup, appear in reverse chronological order on your blog’s home page.
In contrast, pages are for non-chronological content: pages like “About” or “Contact” would be common examples. Pages live outside of the normal blog chronology, and are often used to present timeless information about yourself or your site — information that is always relevant. You can use Pages to organize and manage the structure of your website content.
Source: Pages from WordPress Support (click through to learn more about Pages)
How do I create or edit a webpage?

Here are instructions for creating or editing a webpage:
- Click Pages in the left-hand navigation menu.
- Click Add New if you want to create a new page, or click the title of an existing page if you want to edit it.
- Use the editor of your choice to add or edit page content. For this workshop, we’ll use the Block Editor (also known as the Gutenberg Editor), which allows you to drag and drop blocks of content onto your page and customize them in a granular fashion.
- If desired, you could also use the Classic Editor through its plug-in of the same name, or another page-builder plugin like Elementor.
- Add blocks by selecting them from the menu pane on the left-hand side of the page. Review your page content (and move blocks around the page) in the center. Click into a block and customize its styling and settings from the menu on the right.
- Use Image or File blocks to insert images or add links to PDFs on your pages. Click the Upload button to select a file from your computer (which will automatically adds the file to your Media Library).
- For images, make sure to add alt text once the file has uploaded using the box available in the right-hand settings pane.
- Once you have uploaded things, you can select existing media from your Media Library to upload. All your media lives in your Media Library, so you only have to upload it once but can use it across your site – and your image alt text added here will carry throughout the site as well, so you only have to write it once.
- Using the Embed blocks, you can embed content on your page from elsewhere on the Web – from pretty much any site or resource that provides an embed code (YouTube, SoundCloud, ArcGIS Online…).
- When you’re ready, click Update or Publish to save and publish your changes – or click Save Draft if you’re not ready for it to be published yet. Don’t forget to save as you go!
How do I manage media?
Your site’s Media Library contains all the media (images, video and audio files, PDFs and other documents) that you have uploaded to your site. From the Media Library, you can easily manage these files, and retrieve them for use across one or multiple pages of your site.
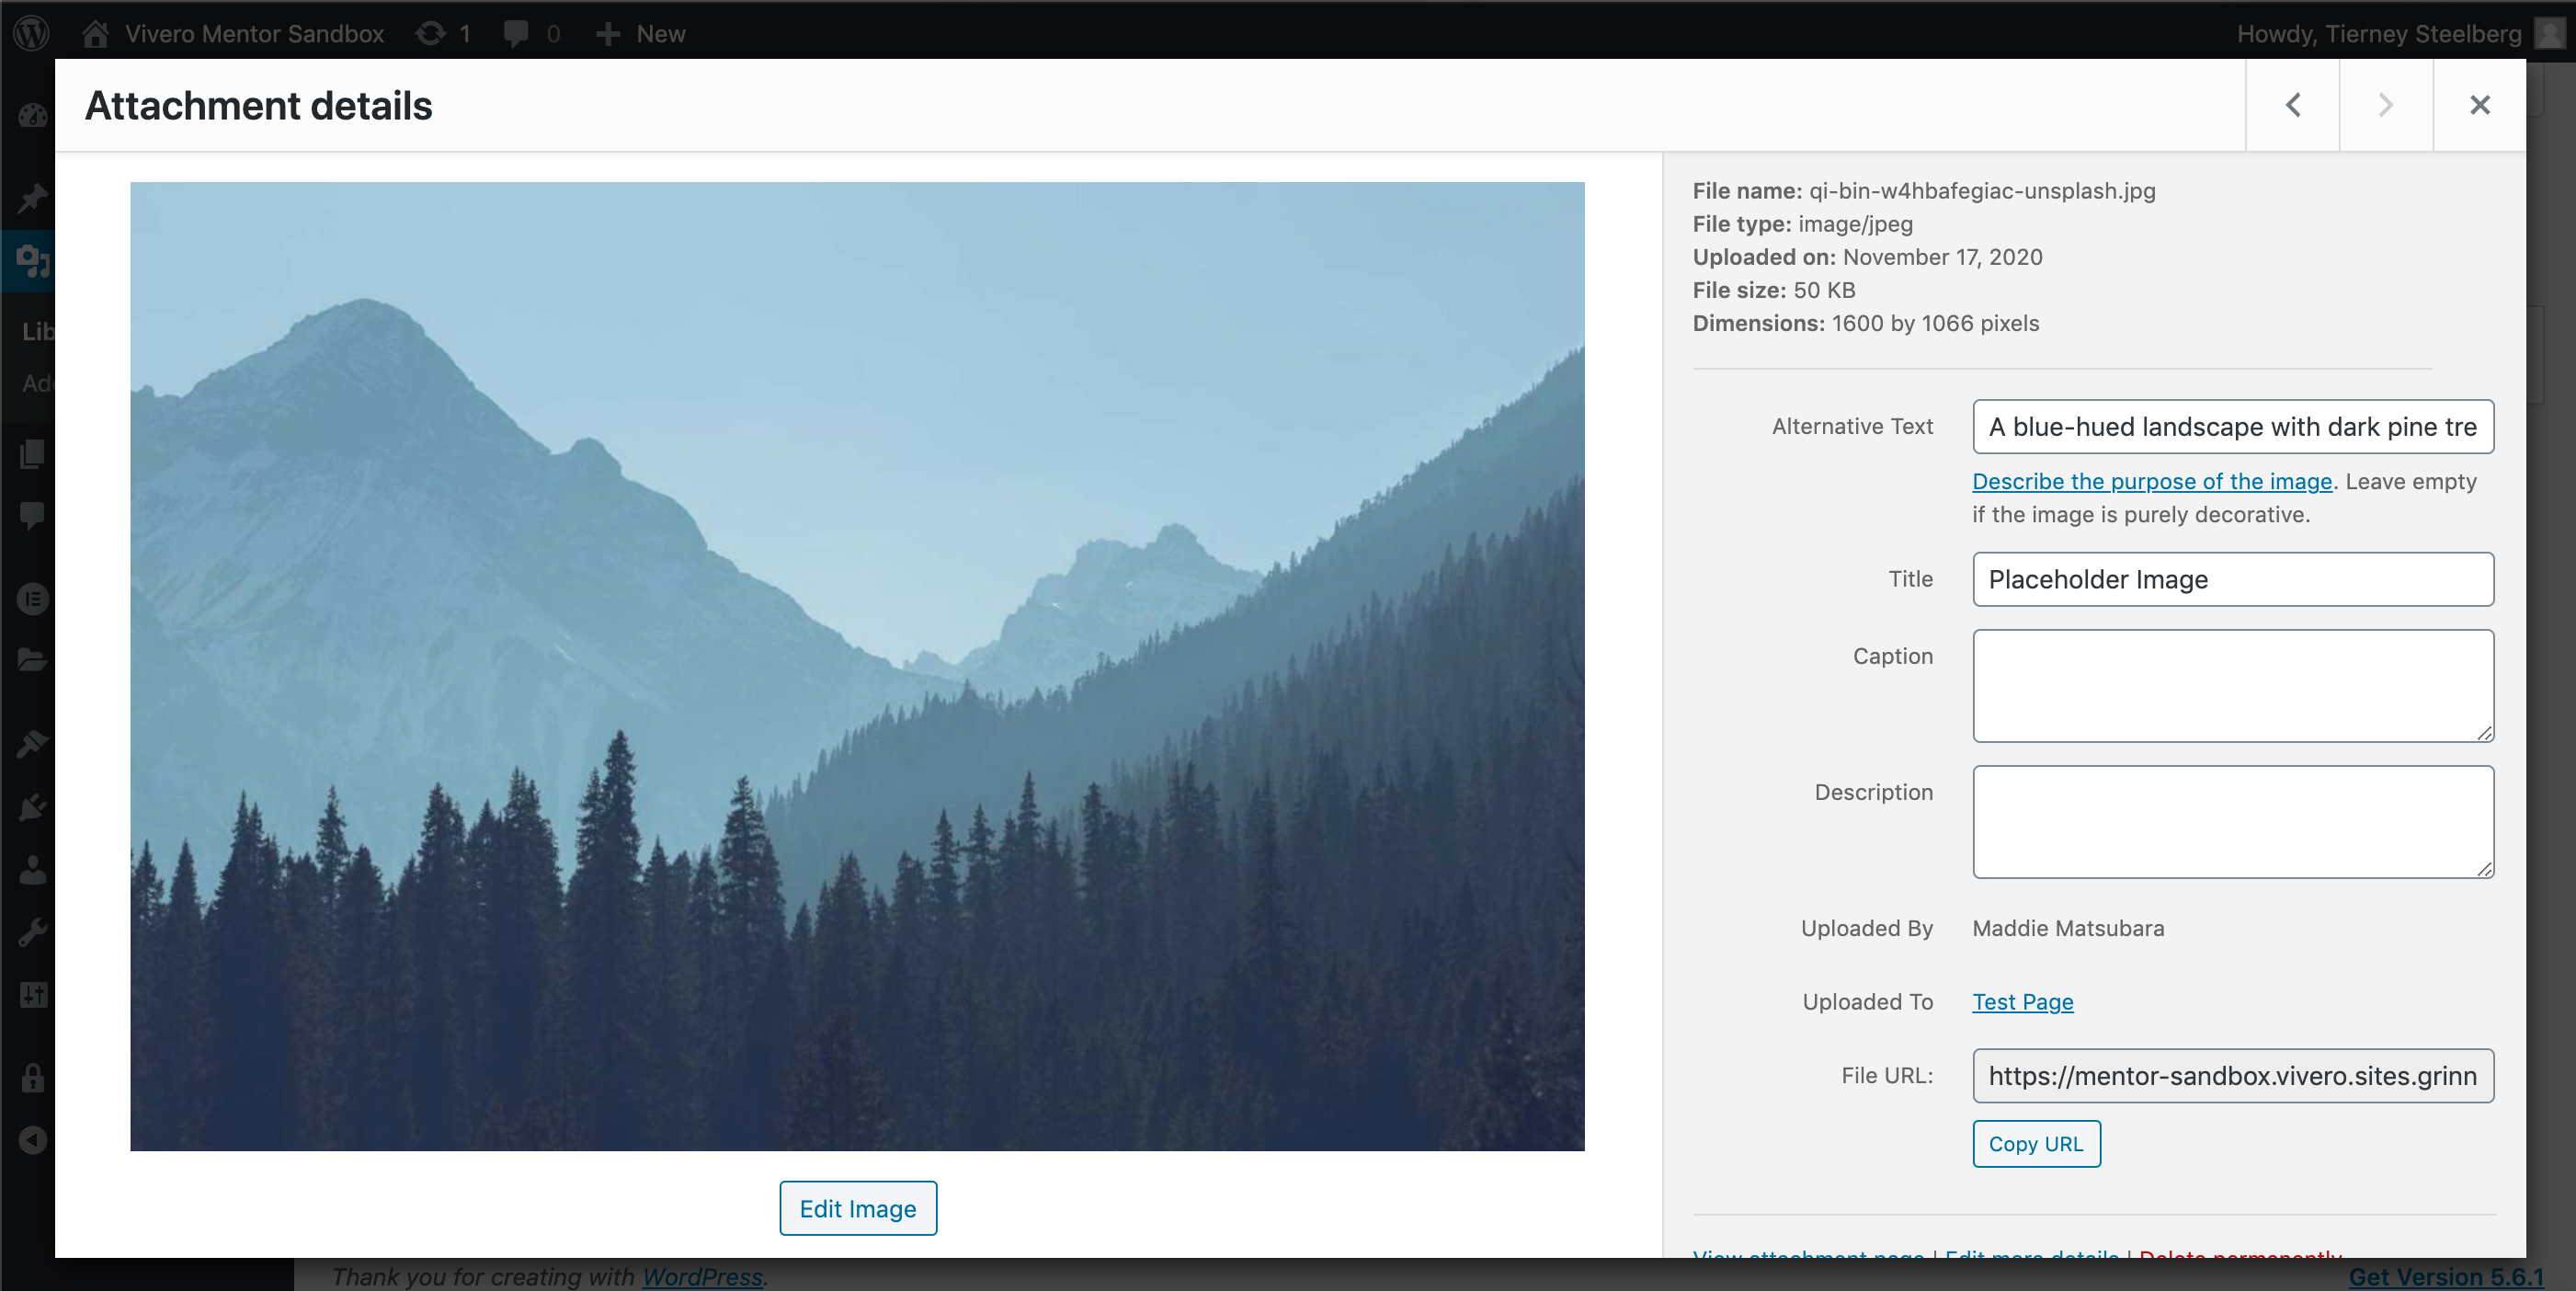
- Click Media in the left-hand navigation menu to access your Media Library.
- To add a new file or multiple new files, click the Add New button, and either select the file(s) from your computer, or drag and drop one or more files to the upload box.
- Once a file has been uploaded, you can edit its title, caption, and description – and, in the case of images, its alt text, for accessibility – and you can also access the file URL, which allows you to link to the file. You can use the file URL as a link on Pages or in your Site Menu.
- Alt text, or alternative text, is text that describes the image for users who cannot see it. It is an important piece of web accessibility for website creators to put in place. You can learn more about alt text for images from this helpful Alt Text article from Moz. W3C Accessibility also has a more in-depth alt text tutorial.
- In the case of images, you can also do some barebones editing (cropping, rotating, flipping) from within the Media Library. The Gutenberg editor also allows you to do edit media from within the page editing view.
- You can also upload media directly to a page while working on building out content – this media will be automatically added to your media library.
Please only use images on your website that you have the rights to use – either images that are public domain or Creative Commons licensed, images whose copyright you own, or images from library databases that are licensed for your use.
Some recommendations for places to find pictures:
- Unsplash (high quality photographs licensed for free use)
- Freepik
- Wikimedia Commons
Don’t forget to cite your sources, whatever you do use!
How do I edit the site menu?
Your site menu dictates the navigation menu for your site that is available to users on every site page, as well as how it is structured (for example, with subpage child menu items that appear underneath a parent item). You will want to add new webpages to your menu and/or link to them from other webpages so that they are available to your site’s users.
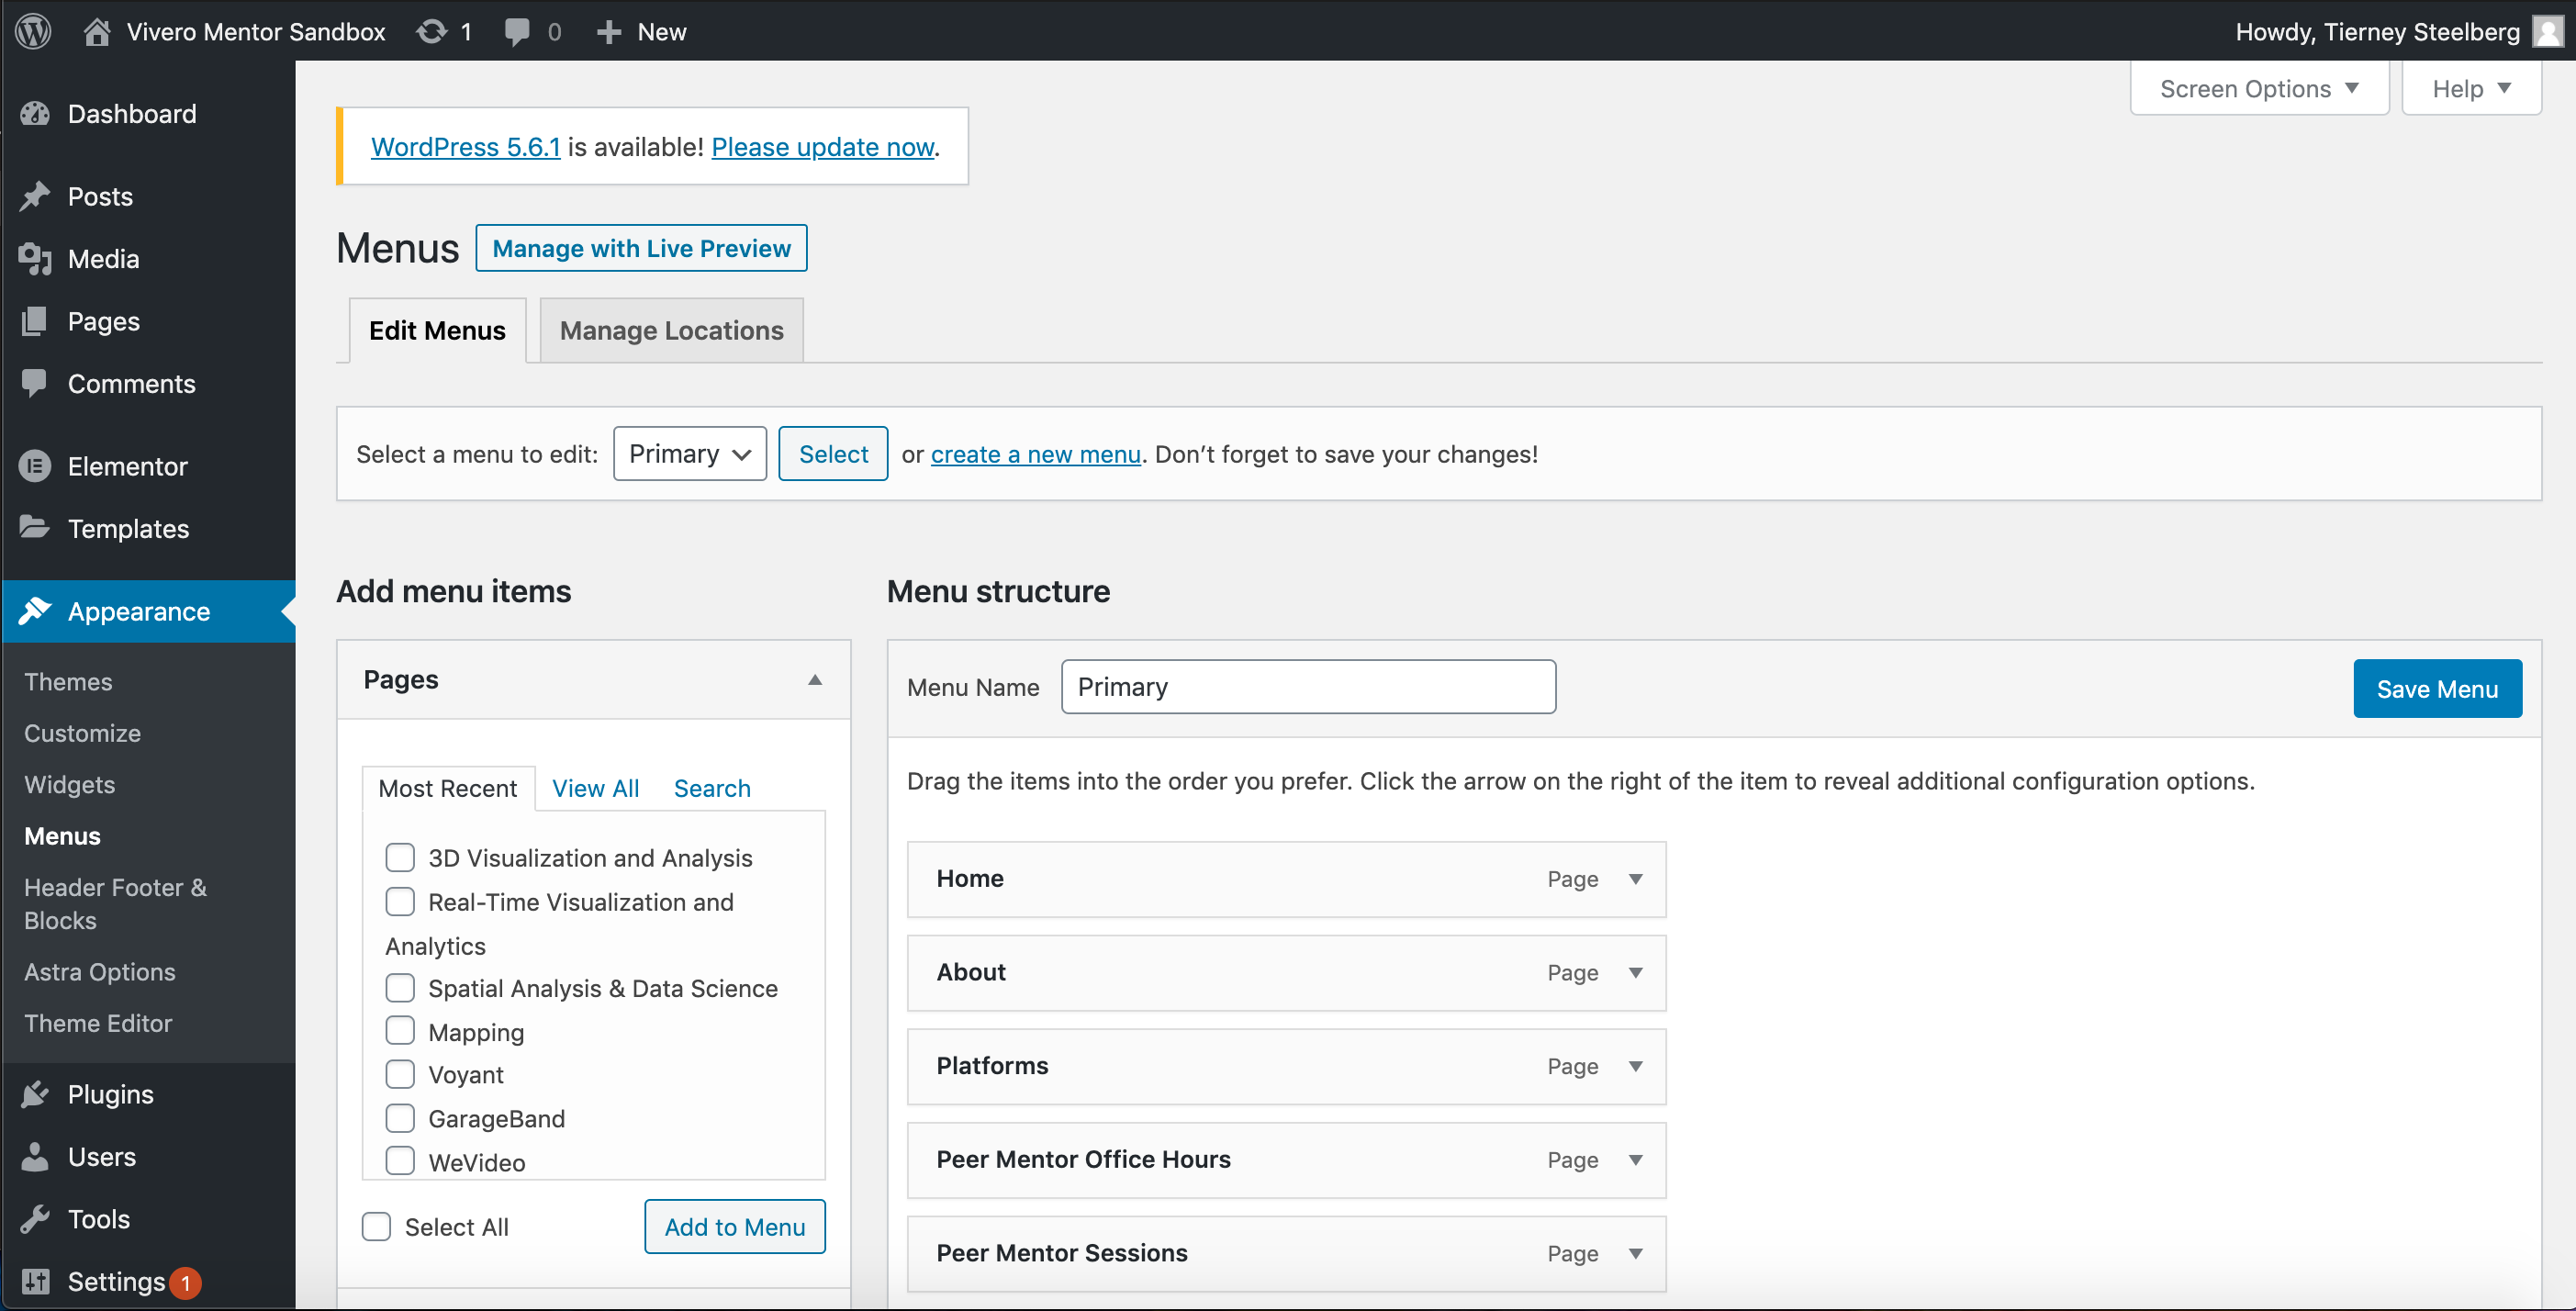
- Hover over Appearance in the left-hand navigation menu, then click Menus. This will bring up the menu editing page.
- The active menu we have created for your site is called “Site Menu.” Under Menu structure you can drag and drop existing items to reorder them or create dropdowns, or select items from Add menu items on the right-hand side to add additional Pages (either Most Recent, View All, or Search from the tabs at the top) and more to the menu.
- You can set your site is to automatically add top-level pages to the menu from here, if you would like.
- If you want one of your menu items to be a link to a file (such as a PDF hosted in the site Media Library), click Custom Links (under Add menu items), add the file’s URL to the URL box, and your desired title to the link text box.
- In order to activate a new chosen menu, you will need to do so from the Theme Customizer page (also under Appearance). More information on that back-end site tool is below!
How do I customize my site?
A theme does much of the heavy lifting for your site design – and beyond that, there are elements within the theme that you can customize. Each theme has different customization options (for example, some themes have a header image you can customize, or allow you to select specific colors to use across the site). If you’re not seeing something you want to do, it may require some back-end tweaking, or changing themes.
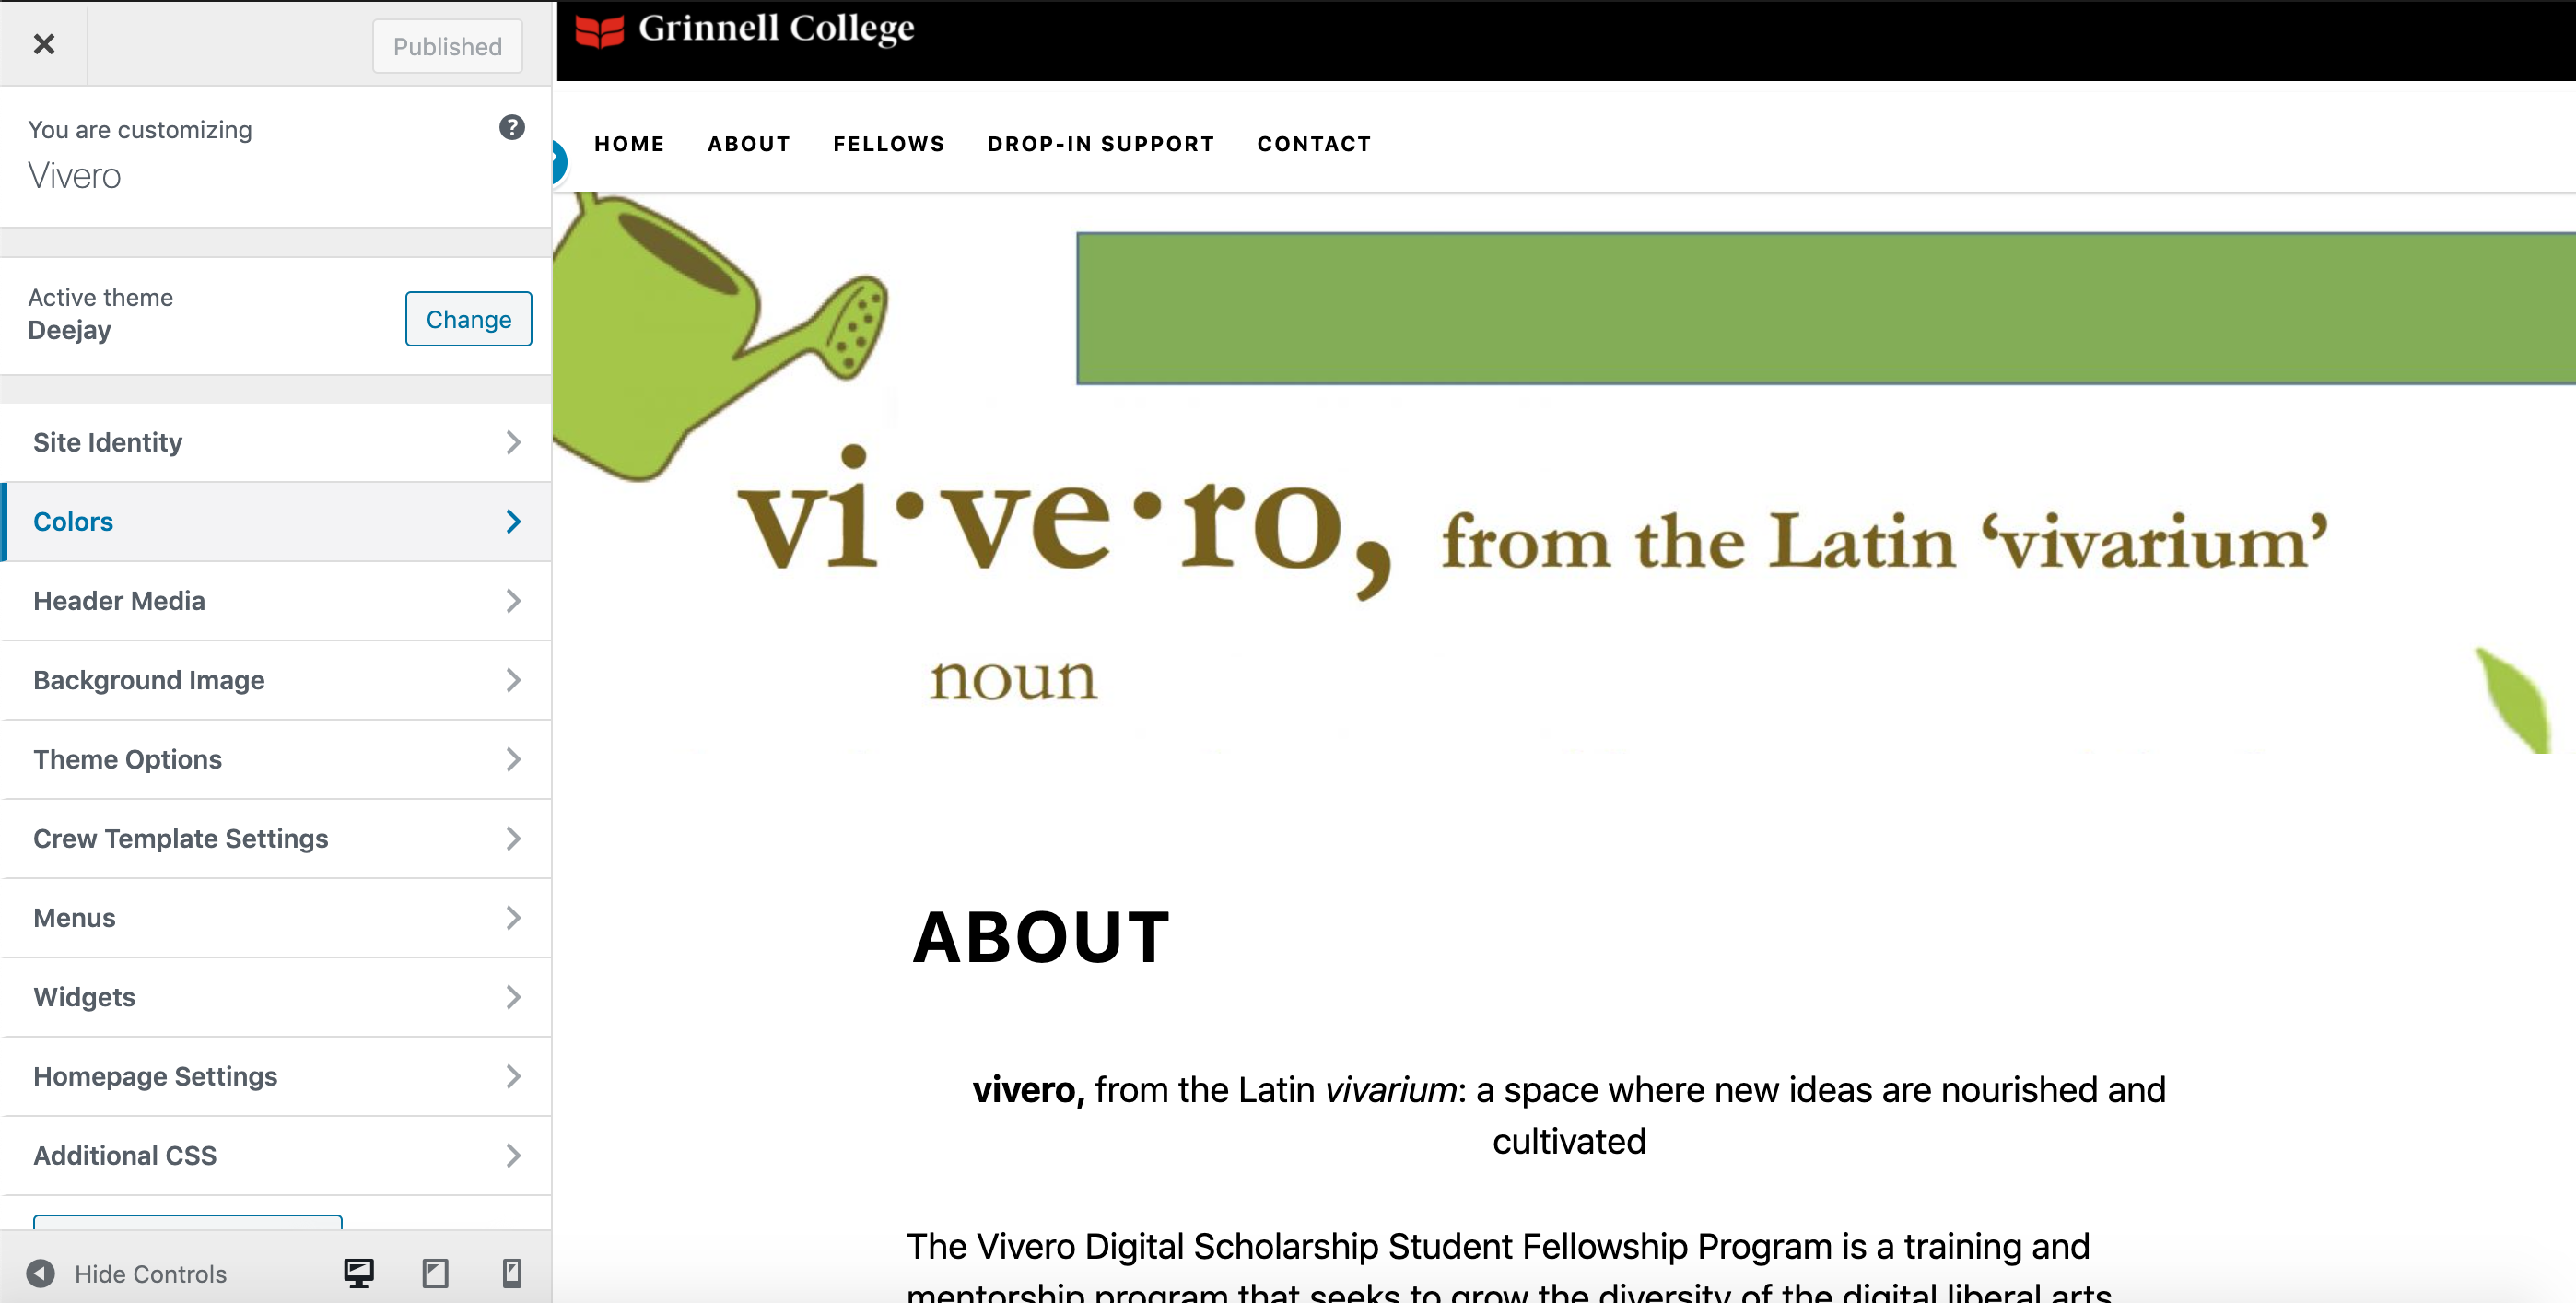
- Hover over Appearance in the left-hand navigation menu, then click Customize. This will bring up the Theme Customizer screen.
- You will see a preview of your site on the right, and on the left a menu with a variety of options for customization. Some of these options vary depending on your site’s theme, as different themes have different levels of customization.
- The following may be of particular interest:
- Site Identity: Allows you to edit the site title and tagline (appears at the top of the site).
- Colors: Allows you to customize theme colors (though simpler themes will have fewer customization options).
- Header Image: Allows you to upload a header image for your site.
- Menus: Allows you to set or edit your active menu(s). The “primary” menu is the navigation menu that appears at the top of your site.
- Homepage Settings: Allows you to choose your site homepage from your existing Pages.
- You can also hover Appearance in the left-hand navigation menu, then click Themes to change your site theme (with some additional themes that come preloaded for you, or by selecting and installing a new theme).
- The Live Preview button lets you see what your site content would look like with another theme!
How do I add additional functionality?
Plugins add additional functionality to your website, beyond the basics provided by stock WordPress.
Your WordPress installation comes with a selection of plugins already installed. You can install more plugins by clicking Plugins from the sidebar menu and then clicking the Add New Plugin button at the top.
For example, the My Private Site plugin makes your site available only to users with a login. To activate it, navigate to the Plugins page from the WordPress dashboard menu and click Activate. Then navigate to the My Private Site page from the left-hand navigation menu, click the Site Privacy tab, check the box to enable login privacy, and click the blue Save Privacy Status box to save your change. When you’re ready to make your site public, simply uncheck the box. (Please note that while the plugin is active, site pages and content are not available publicly, but site Media Library content – such as images – are still accessible via their direct link.)
There are many plugins out there to meet a variety of needs: make sure to read the details carefully. Before you install a new plugin, make sure your plugin has other active installations, good reviews, and regular updates; and is compatible with your version of WordPress before you install it.
Copyright & Finding Reusable Images on the Web
Since your portfolio website is public, it’s important to look for and use images that are licensed for you to reuse freely, without worrying about copyright. Consider using:
- Photographs you took or other images that you created yourself.
- Works with a Creative Commons license, which is is a copyright license that allows works to be used by others. Different types of Creative Commons licenses exist, with differing restrictions. For example:
- CC BY-NC-SA: “This license allows reusers to distribute, remix, adapt, and build upon the material in any medium or format for noncommercial purposes only, and only so long as attribution is given to the creator. If you remix, adapt, or build upon the material, you must license the modified material under identical terms.”
- Works in the public domain, which are freely available and are not subject to copyright laws.
If an image is copyrighted, or you are unsure of an image’s copyright status, do not use it on the website.
Resources for finding Creative Commons-licensed or public domain images:
- The Creative Commons Website
- Unsplash (freely reusable stock photos shared by creators)
- Flickr (filter your search results by license using dropdown below search bar)
- Wikimedia Commons (user-uploaded pictures – public domain & CC-licensed)
Accessibility
It’s important to factor in a consideration of web accessibility from the very beginning of planning your website, to ensure that your site is accessible to all users. There will always be things to update, or issues you might need to catch later, but incorporating accessibility into your web design from the get-go will help you build a stronger and more functional website for all users.
WordPress Accessibility
When using a Content Management System (CMS) like WordPress, many accessibility considerations are already built-in, so there are things you can let your CMS take care of for you. Here are some initial recommendations of things to consider:
- Structure & Layout
- ensure a logical document/page structure (nest your headings correctly: H2 > H3 > H4)
- use tables only for tabular data, not for page layout
- Design
- consider your use of color (color contrasts, colors that are too bright, colors conveying meaning…)
- consider the legibility of your typeface and font size
- Content
- break up walls of text
- provide text alternatives to multimedia content (alternative text, a.k.a. alt text, for images, captions or transcripts for videos), and ensure accessibility of other external files (such as PDFs)
- create links that make sense out of context (avoid “click here”)
When it comes to accessibility with WordPress specifically, you can look for accessibility ready themes and make use of accessibility plugins as needed.
Check Your Work
There are tools out there that can evaluate the accessibility of your site based on its URL and give you feedback to help you improve your site’s accessibility. Once such tool is the excellent WAVE Web Accessibility Evaluation Tool: simply plug in your site’s URL, run the evaluation, and read through the feedback provided. The tool gives you a rundown of accessibility errors, color contrast errors, alerts for things that could potentially use improvement, and even highlights the accessibility features that have been used correctly.
There is a WordPress plugin you can install for accessibility feedback on your site: it is called the Editoria11y Accessibility Checker.
There are additional tools that can check specifically for accessibility in terms of color usage:
- for font contrast: WebAim’s Contrast Checker lets you input color hex codes and tells you whether a particular combination has a high enough contrast for legibility
- for colorblindness: Toptal lets you input a site URL and shows you how your site looks to users with different types of colorblindness
Going Further
If you want to go further with WordPress, look into and play around things like:
- Changing the site theme and customizing more of it
- Installing plugins that add features or functionality to your portfolio
- Editoria11y Accessibility Checker
- PDF Embedder for embedding a PDF
- Fonts Plugin, to access a substantial font library and easily change your site’s default fonts
Get Help When You Need It!
If you have questions, need help, get stuck, or want support trying something new with your portfolio site, there are support resources out there for you!
- Vivero Digital Fellows trained in a variety of digital tools and approaches (including WordPress) hold peer mentoring drop-in hours from 7-9 PM in the Burling Library Digital Studio through Thursdays.
- Tierney Steelberg, Digital Liberal Arts Specialist: email steelber@grinnell.edu
- Mo Pelzel, Director of Academic Technology: email pelzelmo@grinnell.edu
If you want to learn more about WordPress, there are lots of resources online. Check out:
- WordPress.org documentation (make sure you are looking at support resources from WordPress.org, not WordPress.com – that is hosted WordPress, and it looks a little different on the back-end)
- “WordPress Essentials Training” on LinkedIn Learning
- WPBeginner
