 This tutorial by Tierney Steelberg, Digital Liberal Arts Specialist at Grinnell College’s DLAC, is licensed under a Creative Commons Attribution-NonCommercial-ShareAlike 4.0 International License.
Table of Contents
- What Is WeVideo?
- Logging In
- Créez votre story-board
- WeVideo Editing Interface
- Voiceover Recommendations
- Hands-on Practice
- Exporting & Sharing
- Media & Copyright Considerations
- Accessibility
- Get Help
What Is WeVideo?
WeVideo is a cloud-based platform for recording, creating, and editing video. It can be accessed from any browser and from a device app for iOS and Android.
Logging In
Once you have set up your account using the registration link emailed to you earlier this month, you can log in at https://www.wevideo.com. You must access via the registration link first in order for your account to be created.
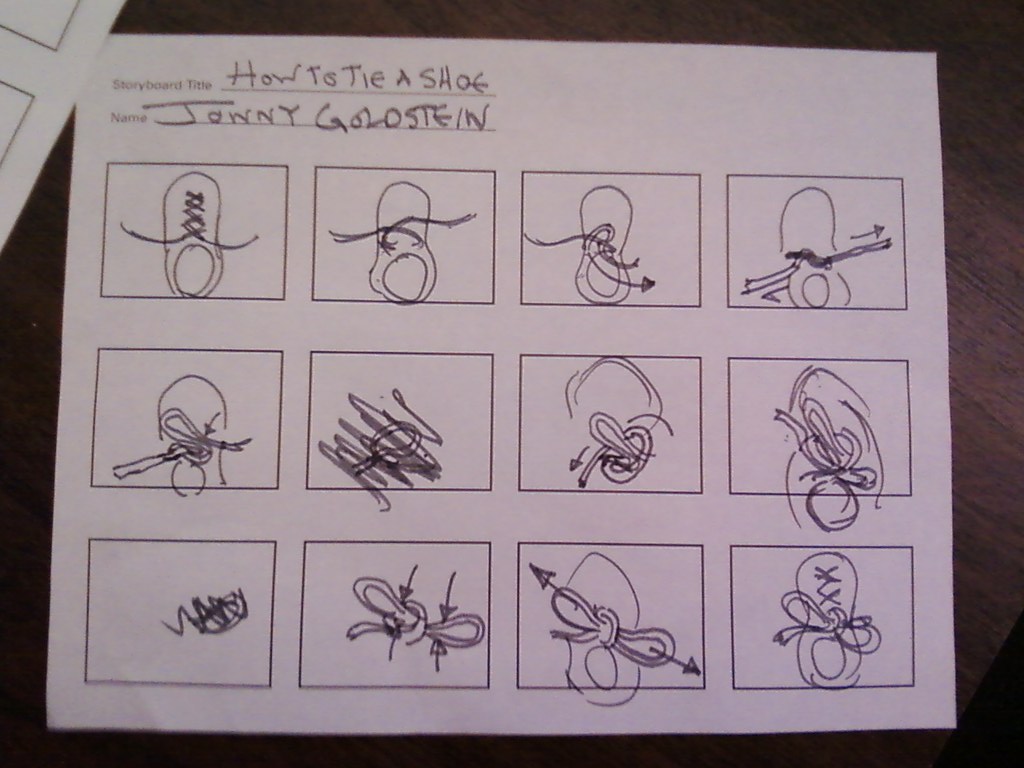
Créez votre story-board
Prenez quelques minutes pour créer un story-board, en pensant à votre thèse. Quelles sont les grandes lignes de votre commentaire ? Quelles images et vidéos voulez-vous associer avec votre texte ? En quel ordre ?
WeVideo Editing Interface
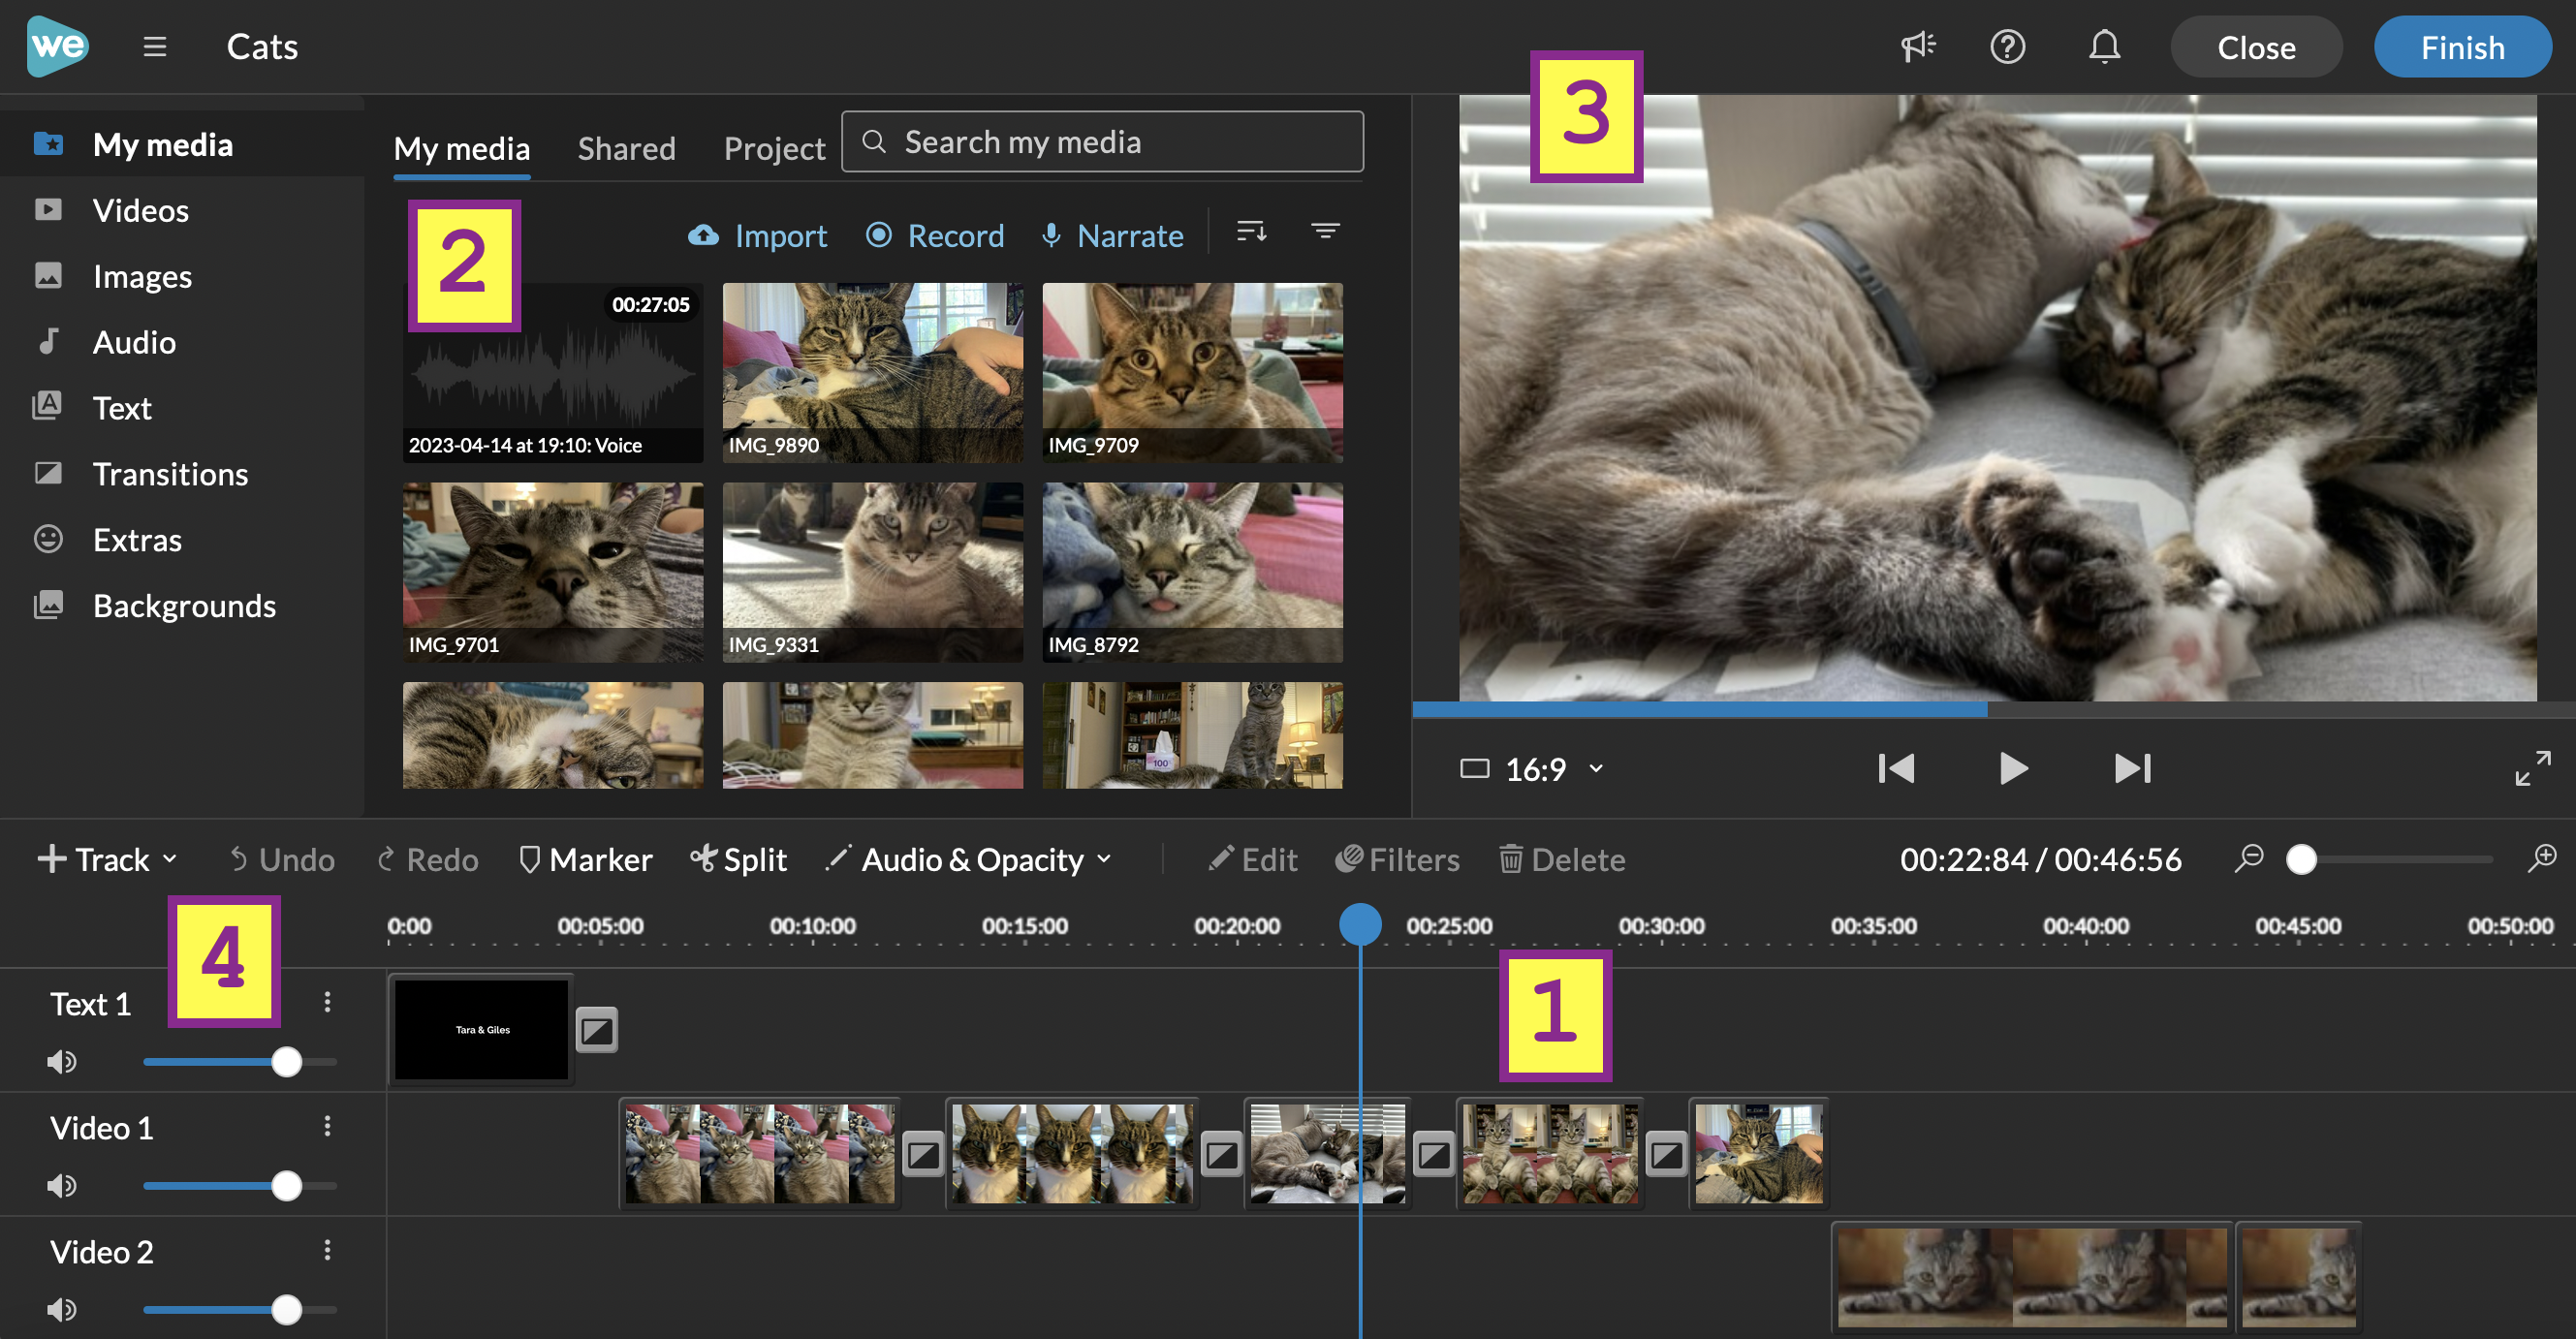
- Timeline: set your video/images, text, and audio here by dragging and dropping.
- The blue marker shows your place in the timeline – move it along the timeline to change the preview as desired.
- Drag the edge of a video to trim it, or the edge of an image to extend or shorten time spent on it.
- You can also split clips (button with scissors, above timeline) to move pieces around or trim excess.
- Double click or click buttons above timeline to customize and edit item settings (video/image filters, image orientation and fill settings, effects like audio fade) – there are tabs with additional options on the left-hand side.
- Media: select media options here, including video, images, audio, transitions and extras.
- Upload your own video and images under My Media.
- Record your own video or voiceover narration under My Media.
- Search for WeVideo media (all licensed for reuse!) in the search bar, drag and drop onto tracks below.
- Filter audio (filter symbol) for music or sound effects specifically.
- Add text as separate content or overlaid on a video/an image.
- Add transitions in between content items.
- Explore additional things like Extras (overlays) and Backgrounds.
- Preview Window: preview your video.
- Tracks: add more tracks and arrange/overlay content across tracks as needed (for example, text over a video and audio throughout).
- Add additional tracks using the plus button – separate things out into different tracks for finer-tuned control, as needed.
- Adjust track audio levels using the audio slider on the left-hand side. You can even bump up audio levels above 100% for audio you need to make louder than it was originally recorded.
WeVideo saves as you go, and you can also save from the top left-hand hamburger menu. From there, you can also view your version history and revert to a previous version. Make sure you remain connected to the Internet so WeVideo can save and sync your changes: you could lose some of your work if you lose connection while editing.
Voiceover Recommendations
Many of you will likely record your script as voiceover over your illustrative images and video clips. You can record voiceover by clicking on My Media (top left) and then Narrate. Here are some specific recommendations for recording voiceover:
- FYI: WeVideo now requires the Google Chrome browser to record voiceover.
- Record a rough draft of your recording early on, to give you a sense of the time it takes you to read your script – with the understanding that you’ll need to re-record as you make corrections.
- Choose a space with minimal background noise to record your voiceover (for example, don’t do it outside – the mic will pick up the Iowa wind!).
- Use a high-quality microphone if you can – Burling Library has recorders you can check out that can be plugged into a computer as a mic. If you can’t check out a mic, use headphones with a mic rather than your laptop mic, as this will be better audio quality.
- Try to break your script and voiceover recording up into chunks, rather than recording it all at once: this will make it easier to re-record pieces of it as needed as you complete your final draft of your project.
Hands-on Practice
Get some hands-on practice by creating a 30-second video:
- Create an opening title sequence using the Text option
- Upload an image of your own to the My media section
- String together some of WeVideo’s own videos and images, using different tracks as needed.
- Add transitions between them from the Transitions tab
- Pull in a sound effect or two from the Audio section
- Record voiceover by going to My Media and clicking the Narrate button
When you’re finished, save projects in the FRN 305 group (homepage > Projects > three dot menu > Invite to project).
At the end of the semester, you will want to export your finished video as a file using the Finish button, which will generate a file you can share in Canvas.
Exporting & Sharing
To share your WeVideo creation as a file when you’re done working on it, click the Finish button in the top right and export your video as a WeVideo download (default option). Your export will be queued, and you will receive an email when your download is ready (this can take a few minutes, so make sure to account for this in your time management). This file can then be uploaded to PWeb. See the export instructions from WeVideo for more detail. It is also possible to share a link to your video if you make it public: see more in WeVideo’s how to share instructions.
Media & Copyright Considerations
When creating a video that is shared publicly, it’s very important to look for and use images, clips, and audio that are licensed for you to reuse freely, so you do not have to worry about copyright infringement. WeVideo provides a variety of images, video clips, and audio that you can freely reuse in your videos. You can also look for a Creative Commons license or media in the public domain.
If a media resource is copyrighted, or you are unsure of an its copyright status, do not use it on a video shared publicly.
Accessibility
Make your videos more accessible by:
- Ensuring high-quality audio with minimal background noise.
- Speaking clearly and slowly.
- Avoiding rapid flashing content in the video.
- Making overlay text readable.
- Providing subtitles or sharing your script.
- Planning for a description of visual information.
Get Help
If you have questions, need help, get stuck, or want support trying something new, there are support resources out there for you!
- WeVideo Support getting started, editing and troubleshooting documentation
- Vivero Digital Fellows trained in a variety of digital tools and approaches (including WeVideo) hold peer mentoring drop-in hours in the Burling Digital Studio (lower level) Mon-Thurs from 7-9 PM and Sundays from 3-5 & 7-11 PM.
- DLAC staff members Mo Pelzel and Tierney Steelverg are available to assist you: email their individual campus email addresses or send an email to dlac@grinnell.edu
